Welcome back to our One Room Challenge makeover series over at Kristen’s house where we are making over her bathroom! If you missed the first couple of weeks be sure to check them out by clicking through the links below. While we had this part finished, we had some technical problems with my computer so I got behind in THAT aspect of this challenge! Well if it isn’t one thing…it’s another! So nobody missed anything, I decided to combine weeks 3 and 4 all about the tiling.
Last time was all about demo-ing the bathtub area since the main reason for doing this bathroom makeover was because we desperately needed a new tub. Our old one was previously painted and was just terrible! Stained all over that wouldn’t come off, and the paint was peeling in spots. I wouldn’t allow my daughter to bathe in the tub so as a 2 year old she was still in the plastic baby tub! Ugh I know I keep mentioning that – but it was bad. I would clean the tub, and knew it was Okay since I had just scrubbed it, but the sight of all the stains made it look much worse.
But anywho – this bathroom makeover has been a bit nerve-wracking since we decided to do all the work ourselves. We knew what to do for the most part, but we still sometimes have doubts as human beings. Second guessing things is normal, but my husband has been great through the whole process and triple checked all of his work! It took longer that way, however, if we come out of this with no problems in the future it will have all been worth it!
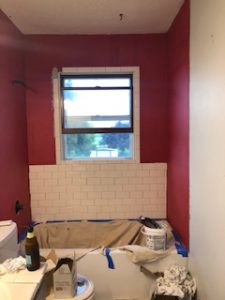
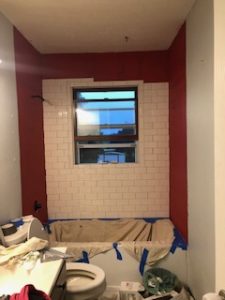
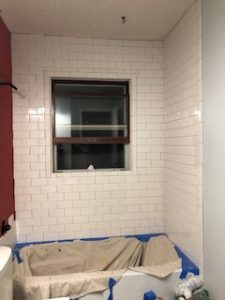
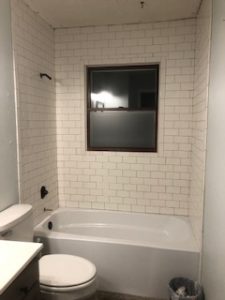
We actually started tiling the shower surround right after the demo but hadn’t finished last week, so we decided to save the tiling for this week’s update! Here is what I have for you:
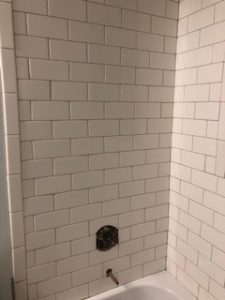
Tip 1: Tiling is no joke! After learning from my cousin when he helped us with our kitchen makeover, I felt confident in being able to tile ourselves. And while it wasn’t necessarily hard, boy was it time-consuming for us as beginners! We were super slow…and had many late nights since we had to wait until our daughter was asleep to make it easier. It took about 4 late nights for just putting the tile on the wall.
Tip 2: Come up with your pattern BEFORE you begin. This is really important which I didn’t realize at first. I thought we could just start on one end and be good. NO! You need to stop and think about it before beginning. I screwed up my pattern on the first couple bottom rows and then realized it was wrong when we were cutting tiny slivers of our tile on one side! That isn’t what you want. No cutting of tiny slivers of tile!
Tip 3: Cover your tub really well. The mortar and the grout especially is really messy. We kept dropping globs and would have to pick it up so we wouldn’t track it all throughout the house.
Tip 4: Tile saws are awesome! We got a fairly cheap one, but it worked just fine for our subway tile. I would be in the tub tiling and then I would mark the tiles for the cuts and send it off with my husband to cut. It was much faster this way since we had to go out to the garage to cut the tile. (The saw can be a bit messy with all that water spitting.) THIS is the tile saw we used.
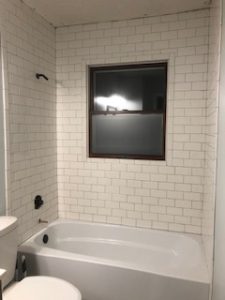
We used white ceramic subway tile, which almost every hardware store carries. It is simple, easy, looks classic and we didn’t need to use spacers. The tiles we got have a tiny little lip on each edge for spacing so you don’t have to use the spacers!
We ended up using the same color grout that we used for the kitchen, but used a quick setting formula so we didn’t have to seal the grout later. This was a tip from the tile man from Home Depot! Both my husband and I did end up having to grout. We had to work in small sections with one person pushing the grout in and the other coming behind to wipe it down since we had a very short working time.
We then sealed the edges with silicone sealer that was the same color as the grout. All of this happened over a series of weeknights that got to be very late and was not very fun… BUT we have a new tub and shower! We still have a lot of work left to do in this bathroom though.
- touch up paint
- put trim back on
- paint ceiling
- finish medicine cabinet
- hang shelves
- decorate
We promise to be back for the rest of the challenge since my computer is working again. Be ready! We will get this bathroom finished yet!




The bathroom looks really good so far. Ya’ll have done a wonderful job and taking your time will pay off in the long run. Can’t wait to see how you finish it out. Good work.
jean
Thank you so much Jean! I definitely thought so too, while it made me nervous taking a long time – I knew it would be worth it! So looking forward to the reveal!